Saturday, October 27, 2012

Halloween Cookies

So, today I'm offering up a special Halloween treat - Skeleton Cookies!


Cute, right? To make them, I started with a recipe that I found here: http://allrecipes.com/recipe/best-ever-chocolate-cutout-cookies/ it sounded really tasty, and though I was worried working with an unknown, I gave it a try.

The batter was a really thick, rich texture and flavor. See how it looked: 


OK, so it might look like something else in the photo :^)...believe me when I tell you that even raw, the flavor was amazing!

Next, I rolled out the dough. I saw a suggestion online for using the cocoa powder instead of flour, and it worked great. Following that, I cut out my little men. I used the special cookie cutter and press from ThinkGeek.com (link here: http://www.thinkgeek.com/product/e9de/).

My cocoa powder and Gingerdead Men cutout (of course, mine were chocolate!)

The little men are ready for transport

I will admit that this dough was a little brittle. I had to be very careful while transporting it to the cookie sheet. Still, I managed to complete the task with little frustration or ruin.

Ready for the oven...
The cookies did not need to bake long (about the 7-8 minutes that I use for my traditional cutout sugar cookies). I'll also note that the recipe didn't make that many cookies with the size cutout that I used (it was about 15 cookies total). It'd probably be great for smaller cookies, but for bigger cutouts, you'll need to at least double the recipe (unless you're only feeding a few).

After baking and cooling, I decorated. This isn't too difficult because of the bones being pressed in, i.e., you basically just fill them in - The cookie cutter manufacturer recommends royal icing, but I went against professionals advice and chose white chocolate. 

Using chocolate is not an easy task, you'll need to melt it slowly, being sure not to over cook it. I was also careful to melt only a little at a time since the chocolate will re-harden after a while. 

In the end, all the hard work was definitely worth it. The cookies came out spookerific. Oh, and they tasted great too!
  

Happy Halloween!

Thursday, October 4, 2012

You're Only One Once, Part 5

Hello all, time for another cake-y edition of Prison City Cakes. *yay* I can hear you all now. Well, let's get down to business. Monkey business, that is. This week's first birthday theme is centered around monkeys.


Well...OK, the main cake is a giant cupcake, but everyone knows it's the little things that matter. Like the adorable Smash Me monkey cake.

Let's take a closer look at the two cakes.


The giant cupcake is a pan available from Wilton. The top and bottom of the cupcake are baked separately. After cooling, they are stacked like a tier cake (i.e., you put frosting on the top of the bottom layer and then stack on the top).  The cake was then base-coated in hot pink buttercream frosting on the bottom (for the cupcake wrapper) and traditional white buttercream frosting on the top. The sides of the "wrapper" are decorated with fondant polka-dots.

The surrounding cupcakes are traditional cupcakes baked in the "new" silicone baking cups. They are topped with bright yellow and hot pink buttercream frosting, and the candles are available through Wilton. 


Lastly, the Smash Me cake in the form of monkey. This little guy is not too complicated. The cake is the small standing bear pan from Wilton (it really is a very versatile pan). The ears were removed and re-located to the side of the head to create monkey ears. The cake is decorated using the star tip (to create the texture) and base of the feet and mouth are made by smoothing the light brown frosting. This is especially important for the mouth as it creates a monkey mouth rather than a bear pretending to be a monkey. The tail is simply made with frosting and the star tip (similar to the cat cake).

I still have a few first birthday cakes to go, but then we'll move on to something completely different. All right, NOT completely. It'll still be cake. Till next time!

Thursday, September 27, 2012

Your're Only One Once, Part 4

This week features the Wilton's castle set. Basically, you bake and stack a two-tier cake (make sure to follow proper stacking instructions - i.e., use dowels and plates), and then you attach the towers. The castle looks pretty amazing when finished, but it can be tricky frosting and, for lack of a better term, sprinkling the sparkles onto the cake. The first cake features pink and the second purple (stay tuned for Cinderella's castle in blue). Enjoy!


 I need to look for a close up of the "Smash Me" cake. It is once again made from the small bear pan, and this time it's actually a bear! The little white bear is dressed as a princess. I cut the crown from Styrofoam (once again, be sure to remove the piece before feeding it to the child) and her dress is made out of buttercream frosting (use the rose tip to create ruffles of fabric.


Not all princesses are the same, so no two princesses can have exactly the same cake! Here we have the castle done in purple and the "Smash Me" bear is brown. Also, instead of the same princess dress, this little bear likes to be surrounded by flowers.

I still have lots more cakes to share. Till next time confectionery lovers!

Thursday, September 20, 2012

You're Only One Once, Part Three

Have you enjoyed the previous two blogs? If you didn't, why are you still here? If you did, you'll like this one as well.

Here we have the kitty cakes:


The main cake was made from the bear face pan from Wilton, as well as a cut 9" x 13" pan. The kitty ears were the cut off corners of the 9" x 13" and the paws are the original bear ears. The space to the right of the Happy Birthday message was for the number 1 candle. The little kitty "Smash Me" cake was made from the little standing bear cake (next time you'll actually get to see it in bear form). The cat's tail is just frosting, and the ears were made from trimming the bear ears into points.

If you ever have any questions or comments, please feel free to post them. I'll answer as soon as I can. **I did have a question on my YouTube video about smoothing the sides - the simplest answer is to make sure that you use enough frosting. If you're using a design pan, you most likely use the star tip to "frost" the cake. However, there are times when the sides are smooth, but the top is star tipped. For those times, make sure that you frost and smooth the sides first. Also, if you're making a cake from the molded pans, be sure to follow the decorating directions that come with it. You can always play with the colors, but if you want the character to actually look like the character, then follow the directions.

Next week will be a two for one (two adorable design options in one blog post) featuring the castle cake kit and little standing bear pan.

Thursday, September 13, 2012

You're Only One Once, Part 2

I know, I know, it's been like two months since I was here, and I was supposed to be updating more regularly. But, you know what? Sometimes people have other things to do. :-)

Let's get to it, shall we? Here is my second  (as in I made it or the second I made at home - it's not like I've had multiple first birthdays *sheesh*) 1st birthday cake:


Isn't it cute?

The main cake was a bunny face pan from Wilton's (http://www.wilton.com/) atop a half sheet cake. The sides of the cake are adorned with little "Candy Melts" bunnies (the white chocolate and bunny shapes were also from Wilton's).

The "Smash Me" bunny cake was the Wilton small bear standing shaped pan. I cut off the original ears, cut ears from Styrofoam and attached them to the bunny.

****Very Important Note Here****You MUST REMOVE the ears from the smash me cake prior to letting the baby eat it!!!****For the love of all that is good and holy, I don't need a million complaints that someone let their child or relative eat Styrofoam and got sick or choked or died. REMOVE the EARS!****Thank You****

More birthday cakes to come.

Wednesday, July 25, 2012

You're Only One Once

I really love decorating first birthday cakes. They're magical, mystical, and end up smashed up into babies' faces. There is truly nothing like them. Or turning one. Of course, nobody actually remembers turning one. That's what pictures are for.

My next series of blog posts will showcase baby's first birthday cakes. Enjoy the cuteness!


Wow, I have a much better camera now. These were taken on my old Olympus 35mm. Can you see that weird purple light streak? Anyway, this is about cakes NOT cameras. Here, we have my first at-home decorated first birthday cake. I've since gotten even better at the bear pan (pound cakes truly are better to use for this pan as they'll support the structure and retain the support better than a standard cake batter).

I love the baby "smash me" lion. Also, I will note that larger lion's mane was a little too soft and ended up melting off (just on the one side as seen in picture two). Ahhh! Still, you can't help but love that cute little lion face. Unless you're heartless. Seriously.

More cakes to come.

Thursday, July 19, 2012

To be continued...Maybe

That's a(n? Are you British? We Yank's tend to drop the an before h rule) Hetalia reference. Okay, so I haven't given up on this blog. I love posting my cakes. I've just been sort of out of it (busy with work, etc.). Plus, it's been way too hot. Seriously.

Anyway, I do have plans for a new post. I plan on updating by next Thursday-at the latest. Till then, in honor of the one year anniversary of my Toronto trip to see Josh Groban, here's a picture of a tired and sweaty Gro-band.


Your Welcome.

Oh, and maybe you wanted to see some cool cakes. OK. Fine. Check out this "wicked cool" site: http://kotaku.com/caketaku/

Hope your lunch break's as nice as mine. Yogurt! Yeah!

P.S. Why does Blogger think I'm on Pacific time?

Monday, May 28, 2012

Geek My Cake (Part Three)

The (final ?) installment of Geek My Cake: Adventures in Spaaaaa(that's enough a's)ce.
I haven't done too many "space" cakes, but of those that I have done, I'm quite fond.

First up a little Star Wars. Mini Luke and Vader toys face off. In the back ground we see the Death Star (made from Rice Krispies base-coated in frosting) and the Star Wars logo in the upper right hand corner. A very simple, cute, and fun way to celebrate a young (maybe even old) Star Wars fan's birthday.


Up next: The Doctor. There have been several regenerations of the Doctor, but this one might be the cutest. Here's a chibi and comical take on the 11th Doctor, who is a cake now. Cakes are cool. Need I say more? This cake was chocolate cake, peanut butter frosting filling, and topped with chocolate frosting. Delicious!


One day I shall make a TARDIS cake, but it is not this day, and so I must say farewell for now.

Thursday, May 17, 2012

Geek My Cake! (Part Two)

Next up on Geek My Cake, Anime cakes! 

I love anime and manga. When my family asks for characters from favorite shows to be on their cakes, I'm happy to oblige.

First up, for my nephew a young Goku cake! Goku is actually a pretty easy character to draw (very simple eyes). Once you've sketched him a couple of times (and believe me, I've done my share of Dragonball/Z fan art - http://lovellschibichara.deviantart.com/), drawing him on a cake is a fairly easy task. Honestly, the hardest part is probably mixing the black frosting.


Next, here's a perennial classic: Hello Kitty! Best of all, she's a fairy riding on a unicorn. It's like three wonderful worlds combined! This was actually my first time drawing kitty and was based on a puzzle that I purchased for my niece.


This here is my cake! Yes, I decorated my very own birthday cake. As you can see, this is my favorite version of Usagi/Sailor Moon: Princess Serenity. Her portrait is accented by a bouquet of roses (my favorite two-tone).


Next in line is a (fairly) recent favorite: Gaara, from Naruto! My niece likes a lot of "bad boy" characters. I would be worried, but she's only eight and also like Raoul from Phantom (you can't get any more boring and safe than that guy). Plus, Gaara ends up OK in the end. Either way, I was more than happy to fulfill her request for the sand village Kazekage.


Finally, my latest in the anime-themed line. He can at times be annoying and a bit...well...lame, but we have much love for the legendary sword, Excalibur. If you do not love this cake, I've got one word for ya': Fool!


And remember, "Never talk to me when I am humming to myself."

Next time on Geek My Cake: Adventures in Spaaaaace! But seriously, don't get too excited.

Thursday, May 10, 2012

Geek My Cake! (Part One)

My family is made up of geeks (or nerds or whatever else you want to call us!), so I get to do a lot of awesome cakes.  Usually, I hand draw characters onto the cakes and outline and color them with the buttercream frosting. Today, I'm going to share a few of my favorite geektastic cakes.

First up: Video Games!


Here's Crash! I sketched Crash Bandicoot several times (do you know how many versions of Crash exist?!) before finally settling on this design. Very fun and super cute. I'll be adding my sketches to my Deviantart account, so you can check it out here: http://lovellschibichara.deviantart.com/ if you want.


Next, Mortal Kombat! My nephew wanted the gray background, Mortal Kombat logo, and stick figures fighting around the edge. I, of course, had to oblige! Fun fact: the inside was filled with strawberry gel so that the cake would bleed when cut.


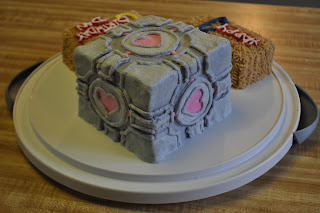
The cake is not a lie. These cakes were inspired by the video game Portal for my brother's birthday. I know that the one portal should be more orange, but I ran out of the color X-P. Also, I was very upset that my dark gray faded on the companion cube, but I promise you: it was dark gray. Fun fact: the portal cakes are chocolate cake with peanut butter frosting! Yum!


My most recent game cake: a zombie from Zombieville USA. I had to make the light green zombie not the dark green or the grayish! It was very fun drawing this little guy...I also enjoyed making the blood with the bone sticking out of it. Does that make me weird?

Next time on Geek Cakes, I'll share some of my anime-inspired cakes. Yeah!

Wednesday, May 2, 2012

Using Bakery Kits on Cakes

Cake kits are usually used in cakes you purchase from chain store bakeries (other bakeries utilize them as well). I usually like to create my own cakes or use the Wilton character pans for character cakes, but I have done some cakes using the kits.


Disney Princesses can be a joy for any little girl to see on her birthday cake, but it would be difficult to put more than one on a small cake without cake kits. The kits can often be purchased at the chain store bakery or online (I like buying them at Amazon). Also, if you need to spray the background, Wilton's has a wonderful easy-to-use spray can (Color Mist Food Color Spray) that can be purchased from Wilton's (Color Mist) or from most craft supply stores (I use my local A.C. Moore).


For the My Little Pony: Friendship is Magic cake, I added Pinkie Pie and Spike, as well as cupcake rings. The great thing about this kit is that the two figures (Applejack and Twilight Sparkle) were the same size as the molded plastic toys, so they are a great gift to any MLP fan.


Barbie! No series of cakes can be complete without Barbie. This cake design required stacking the cake, and removing a section of the top layer (for Barbie's patio). The "dream house" opens in the back, is decorated inside, and comes with paper doll cut outs to play with.

I consider the My Little Pony: Friendship is Magic and Barbie cake kits to be super kits. They truly are usable toys that you decorate cakes with. 

I hope that these designs might inspire others to try at home decorating. I'll be back soon with more cakes!

Thursday, January 19, 2012

Holiday Baking

I love to bake during the holiday season.  It seems like everything smells and tastes better.  That, and I love peppermint.

One of the treats I made for the holidays was Peppermint Ribbon Cake from Taste of Home (click the link for the recipe: Peppermint Ribbon Cake).


This cake was delicious and even the kids who weren't sure of the peppermint (what is it with kids not liking peppermint?) enjoyed this cake.


The final treat of the Christmas season was, of course, cookies.  Every year I make cut out cookies, and this year I also did some bon bon cookies and a few new recipes as well (including a delicious chocolate cookie with M&M's inside and Candy Cane Kiss Cookies).  Seeing these cookies still makes me smile.


Until next Christmas, farewell yummy-licious cookies!